


New article
Recently updated
Creating and edit a self-service report

Who is this article for?
Report creators who need to build, format, save, and manage self-service reports in Insights.
Creator access and a data source available in Insights.
Self-service reports allow you to build formatted, table-style reports from a data source that can be printed, exported to PDF, or delivered on a schedule.
Understanding when to use self-service reports
Use a dashboard to explore data with charts, filters, and the time bar.
Use a self-service report when you need a formatted, table-style document that can be printed, exported, or delivered on a schedule.
Benefits of self-service reports include:
- A familiar report layout with rows, columns, totals, and sorting
- Custom headers and footers with text and images
- Control over page layout including paper size and orientation
- High-quality PDF exports that remain clear when zoomed
- Scheduled report delivery by email
- Easy sharing with users and groups
Note: Only users with Creator access can create self-service reports.
Creating a report
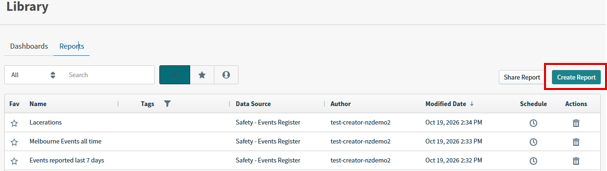
Reports are available from the Reports tab in the Library.
To create a self-service report:
- Select Library from the left-hand navigation menu.
- Select the Reports tab.
- Select Create Report.
Selecting a data source
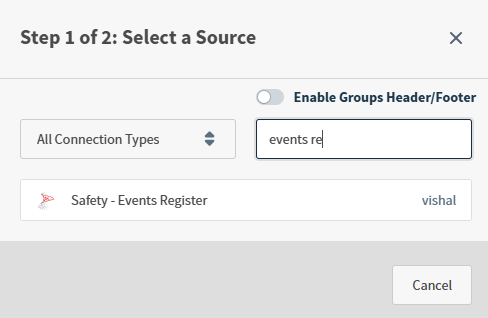
To build a report:
- Select Select Source.
- Choose a data source.
- Select the fields you want to include in the report.
- Select Create Report.
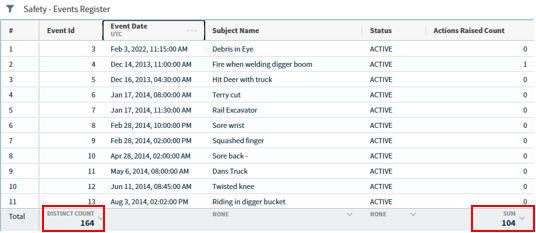
The report opens in a table-style layout using the selected columns.
Formatting report data
The report editor includes options to customise how data is displayed.
Available options include:
- Date Range to control which records are displayed
- Totals for numeric fields
- Sorting to organise report data
- Column Order by dragging column headings
- Date Format to change how dates are displayed
Adding headers and footers
Headers and footers can be used to add branding and report information.
To configure a header or footer:
- Select the Report Header & Footer icon.
- Enable the header or footer.
- Select the edit icon.
- Enter the required text.
- Configure formatting options as required.
- Insert images using a valid image URL.

Note: The report name, report date, and page numbers are automatically included in report output even when headers and footers are hidden.
Saving a report
To save a report:
- Select the save icon.
- Enter a report name.
- Optionally add a description and tags.
- Select Save.
The report is then available in the Reports tab of the Library.
Exporting reports to PDF
Self-service reports can be exported as PDF documents for printing or distribution. PDF exports preserve report formatting and provide clear, high-quality output.
Scheduling report delivery
Self-service reports can be scheduled for automatic email delivery. Scheduling allows reports to be delivered as PDF attachments at specified times.
Note: Ensure recipients have the appropriate access permissions before scheduling report delivery.
Tips for working with self-service reports
- Keep header and footer images between 200 KB and 500 KB for optimal performance
- Use clear report names to make reports easier to locate
- Review report permissions before sharing
- Use groups when sharing reports with multiple users
- Apply totals only to relevant numeric fields